

Ideas for art work are all around us. I was at a friend’s house the other day and spotted this in her garbage: Continue reading
 |
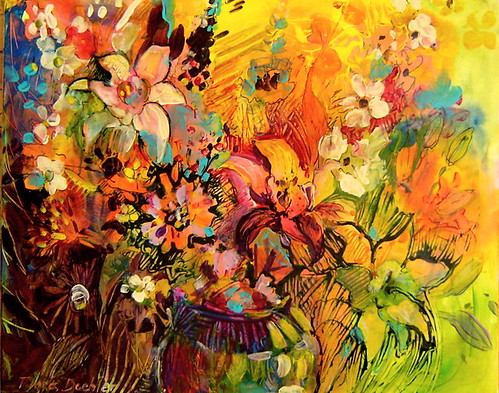
| In the Begonia Garden by Flora Doehler, 2010. 8″ x 8″ |
This past weekend I joined over 70 artists to ‘Paint the Town’ in Annapolis Royal. This annual fundraiser for the local Arts Council is a great opportunity for artists to show and sell their work and for collectors to watch artists at work and to buy art at reasonable prices.
 |
| If you are curious about the contents of my painting kit, click on the photo and read the notes at Flickr. |
 |
| The Artist entry fee is $12. |
 |
| Surrounded by happy flowers. |
Wonderful until I realized that I’d forgotten to bring containers for my paint water!! I finished my treat and headed for the recyling bin where I found plastic juice containers! My sharp knife soon transformed them into water jars and it was smooth sailing after that.


 |
| This was my largest painting. I used up all my matt medium on it. |
My Sunday problem was that I ran out of matt medium! It’s an essential part of my kit because I use it to get the scratching-in effect in my paintings. I searched out other artists in the park and was given some by artist Shannon Bell and when that ran out, a bottle of the stuff from Louise Baker, an artist with a love of colour who lives in Halifax. Thank you Louise and Shannon!!!
Here are the paintings I did in the Victorian Garden until the sun drove me away. (Click on the images to enlarge them.)


 |
| The challenge here was to edit the elements down to make sense of the scene in a painting. |
They were visiting from Montreal and I told them about the silent auction. They later lost out on the bids for 2 of my pieces, but found their way to our studio the next day where they bought 2 paintings that I had been working on in my garden. Here is one of them:
 |
| Nicotiana in garden chez moi. |


 |
| The Pond sketch on 9″ x 12″ watercolour paper. ( The paper is actually white) |
 |
| Acrylic paint brushed into damp paper. |
It was an exciting weekend on many levels – wonderful to meet painters, wonderful to have such a positive response to my work, wonderful to create in such an inspiring setting. And, wonderful to earn some money too which was just as well because our house water situation was failing while I painted.
See you next year at Paint the Town!
 |
| photo courtesy of Trish Fry, Annapolis Royal Historic Gardens. |


At least once a day I intend to dash off a blog post because at least once a day something that merits sharing happens. The trouble is that things never seem to settle down long enough to write about it. It’s funny, really. I once worried whether life would be too quiet living in a little village that is 2 1/2 hours by car to the only city in this province, Halifax, with a population of less than 400,000. (Does that even qualify as a city?) Continue reading
 |
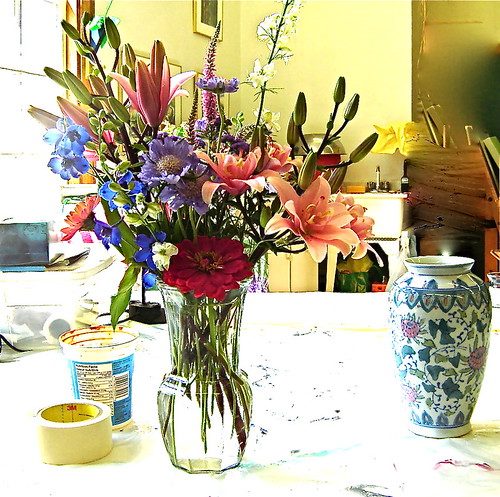
| Bringing flowers into the studio and onto the canvas. |
The lupins and iris are blooming and there is a riot of colour outside. I wait every year for this short time – the three week window when iris are in bloom so that I can paint them. Since moving to our house in Nova Scotia a year ago, I am now blessed with hundreds of lupin that ring our garden and our yard and bloom at the very same time as the iris. I am spending each day with my brushes painting these beauties with fluid acrylics.


I am approaching them using more realism than I usually do. I want to really learn and feel the shapes of the petals so that I can know how a Siberian iris is shaped. How a Siberian iris feels. In the past, I grew bearded iris, but last summer, a friend gave me several dozen clumps of iris that are now blooming all over our property!
 |
| One year ago, I planted all these iris clumps everywhere! |
Their grape colour is delightful and I am using dioxazine purple, ultramarine blue, gold green, hansa yellow medium and a touch of quinacridone violet in these paintings. The paint is Golden fluid acrylics. They are my favorites because of the intense colours and ease of use.
 |
| Painting detail. |
 |
| Painting available at Green Willow Studio. |
I am also working on some small canvasses to prep for the Farmer’s and Artist’s Market that is starting up this Sunday in Bear River.
This means I am working to two deadlines: the iris bloom time and the market one! It’s a race that I am quite enjoying!
 |
| Several days of rain and humidity have brought out all the iris. These are bearded iris. |
This post is cheating really because these photos are neither metalsmithing pieces nor paintings, but oh, aren’t the colours just gorgeous? I photographed them in the studio today and tried to set them up in compositions that would be interesting to paint.
I love the shapes and the colours in these photos. I tried to be mindful of the negative spaces around the flowers as well as the postive flower shapes. As I pointed my camera at them, I imagined the viewfinder as being a canvas and snapped away. Continue reading
One night last August, Larry drove us home through the Annapolis Valley while this sky drama unfolded. That ribbon of orange light that contrasted with the purple-indigo sky was so captivating that I’d wished I could paint it. I snapped these photos with my digital camera. (I never even go to the grocery store without it.)


While I was painting the flower bouquet, I remembered these photos and how I’d always meant to paint the scene. Only at the time, I thought I’d use watercolours. Now that I’m experimenting with oil paints, I really wanted to interpret the scene with my oil paints and oil sticks. Continue reading

I’ve been working in our studio on an oil painting and using the techniques that I learned this week at Wayne Boucher’s studio. So far, I’ve applied the paint by
Before today, the last time I had any instruction in oil painting, I was an international student in Germany. That was 40 years ago in East Berlin.
Since then, I’ve been to lots of watercolour , mono-printing and acrylic painting workshops, but never oil painting. I often think of oil painters as fairly traditional realists who use muted colours, whereas I prefer strong colours and an expressionistic approach to my subject matter.

Last weekend at the Annapolis Region Community Arts Council (ARCAC) Annual General Meeting, I ran into Nova Scotia’s celebrated painter Wayne Boucher who breaks all of my stereotypes about oil painters. His work is bold, abstract and etherial. He loves colour and has a background in printmaking, which I think informs his choice of method and materials. Continue reading
I wrote about how difficult it was for me to motivate myself to paint after setting it aside for months. In order to get back there, I had to remind myself about what I had done in the past to jump-start my creativity when I’d had a ‘fallow’ time.

My Skype painting session with my friend Kathy had helped to bring me back to the paint brush. Continue reading
Question: How do you become re-motivated to do a beloved activity again?
Answer: Try doing whatever worked in the past.

I haven’t written very much about the art side of our lives lately. My painting took a back seat when we finally moved into our wonderful house six months ago. Continue reading
Watch my latest video tutorial about monoprinting using cut paper.
[youtube=http://www.youtube.com/watch?v=uaO2Ylye6tc]

My latest very exciting news is that I sold a painting at the Flight of Fancy last week. I blogged about the creation of this canvas last March. It was inspired by the kindness of friendship. I wonder what thoughts or feelings it sparked for the buyer. Continue reading

As an artist I believe it is important to show some stages
of development in the creation of a piece of work.
It gives the viewer a window into the making stage
that is not present once the work is completed. Continue reading

With my shoulders and legs sore from rototilling the garden, I headed for the studio at the end of last week to paint some of the fabulous purple lupines that grow wild around our house. I also wanted to capture the beauty of some masses of Siberian Iris that my friend Pamela gave me from among the hundreds that grow in her flower gardens. Continue reading


I was reminded of this a while ago when I pulled them out to use as ink in printmaking. I wondered what it was like to paint with oils compared with the acrylics that I’ve been using for the last 20 years.


This winter I’ve been printmaking using easy-peasy materials. I enjoy the high contrast and the textures that printmaking presents, and I wanted to bring that same feel to my next painting.
Inspiration comes from different places all the time. In the case of this painting the color, the tulips, the pears, the spring season, and the friendship behind the vase all combined to inspire me. Continue reading
While my main form of artistic expression is painting, working with textiles has a big appeal for me too.
 |
| Playing with fabric and fibres in the studio. |
At different times in my life I have woven, screen printed on fabric and sewed with appliqué.
 |
| Hand woven cotton warp. |
My approach to textile work is very similar to painting. In both cases I use strong colour; I enjoy lots of texture and I use the interplay of light and dark and complementary colors.
 |
| Fabric painted with acrylic, printed with bubble wrap. |
Many, many well-known painters have worked in this medium. Last spring in Los Angeles I saw some beautiful paper appliqués by Matisse in the museum there that inspired me to sew this little bag.
 |
| Cotton, arctic fleece, netting and ribbon. |
My daughter Emily is an animator and I am inspired by how she integrates her animation sensibilities into her sewing.
 |
| Emily designs, sews and paints dolls and creatures. |
Another source of inspiration for me is artist’s blogs and sites on the Internet. I check the daily blog of my friend and fellow painter Barbara Muir. I love her use of colour and we had many shows together in Toronto. Her persistence at writing a daily blog about painting inspires me to create and make better use of all the precious time I have.
 |
| Barbara drew me while we talked on Skype! |
Recently I came across the site of Susan Sorrell, a fiber artist. Her work excites me because of her bold use of color and texture. I signed up for an online class with her called Personal Symbols — who could resist signing up for a course with the name like that!
 |
| Susan Sorrell’s work. |
Susan has been teaching for a number of years and the course comes with PDF handouts with lots of photographs. She has a forum on the Internet for the class where participants can show and tell their progress. I haven’t used the exact materials on her list. I’m adapting what I already have. Susan suggests painting fabric dye on interfacing fiber, but I’m using canvas and watered-down acrylics.
The assignments use a combination of drawing, painting and sewing which is quite exciting for me to combine.
 |
| Combining symbols. |
There are at least three assignments connected to each of the six lessos. Ingeniously she had each of us draw and make up some of our own symbols.
 |
| My Symbols. |
In the following image I have cut out and combined some of my symbols. The fabric is cotton and I ironed a stitch witchery product to the back of the cloth before I cut the pieces out. In this way the pieces stuck down when ironed. Then I embellished it with buttons and beads.

I would like to try some of these techniques in acrylic on a large canvas. It’s nice to know that it’s possible to take a course online and to feel so inspired by it and by the links to images and blogs and websites of other participants.
Susan Sorrell offers quite a few different online courses. Her enthusiasm comes across loud and clear and I would recommend any of her courses. She also hosts a monthly chat with people in the creative arts and that is quite inspiring too.

The course is opening a new world for me…a truly virtual community of people combining paint and fabric and a passion for creativity.
 |
| Starting a painting. |
I like to paint from life, which means painting on location or with the thing that’s being painted actually present. Painting from photos just isn’t nearly as satisfying for me because I can’t get as close to my subject as I would like to. You see, not only do I like what happens when paint goes on a surface – the explosion of color and movement of the brush over the canvas or paper and the mixing of colors, I very much enjoy looking at my subject and really, meditating on it.
 |
| This Peony is stunning and so is the shadow. The scent is also out-of-this-world! |
If I’m outside I can listen to the sounds around me of birds singing or the sound of the wind rustling leaves or grasses blowing in the wind. I enjoy the smell of the air and the fragrances of the earth and plants.
 |
| These 12′ tall hollyhocks were so inspiring and called out to be painted. |
I like to watch shadows flit across a field when clouds move across the sun. I enjoy the many shades of green in the landscape. Painting becomes a truly sensual experience.
 |
| The painting is 3 feet high and was started on location and finished in the studio. |
If I can’t go outside because of cold weather or rain, I can still set up a still life and paint indoors. In that case I am often examining flowers close-up and checking out the petals and the shapes of the blooms. When I lived in the city it was possible to buy fresh flowers, even in the winter, for a very low price. Unfortunately, that is no longer the case for me here in Bear River. Fresh flowers are very expensive and the choices are quite limited.
Last summer I had a flower subscription with Cheryl Stone of Bear River Blooms. Every week Cheryl would deliver a fabulous bouquet to the studio complete with vase. Cheryl grows the flowers herself and will cut for you a totally custom-made bouquet.
 |
| Flowers by Bear River Blooms |
Cheryl would call me in advance to find out what my colour choices were and ask what type of flower I preferred. Talk about being pampered! I wasn’t able to paint all the beautiful bouquets she delivered but I did take photos and now I am printing some of them out to use as inspiration for my new paintings. It’s certainly not like working from the original bouquet but because I staged the photos in the first place with a painterly composition in mind, it’s the next best thing.
 |
| This was one of my favorite bouquets last summer. |
I love peonies, in part, because they remind me of my dear mother and my grandmother – two wonderful, clever and witty women who passed on their love of flowers and of gardening to me. What I also like about this photo are the colours. The contrast of the lime green in the lupines with the dark pink of the peony are very appealing. Red and green are complementary colors which I like to use in my paintings. I decided to use that pale lime green as the ground or the background for the canvas.
Here is a video of my first approach to painting this bouquet. It morphed quite a bit until I felt OK with the results.
When I work on a new painting, I do so as long as it gives me pleasure. If I start feeling like I don’t know where to go next or I feel a sense of frustration, I stop. It is possible to look at the same piece of work on different days and feel different levels of satisfaction with it. Sometimes the only way to know the next step with a painting is to put it away and to work on something else.
This week I returned to the painting and was so excited about working on it, that I thought of different ways to express “peony” and started 2 more paintings!
 |
| Last Summer”. 30″ x 36″, acrylic (sold) |
This painting, inspired by Cheryl’s flowers has inspired more paintings from me. And inspired is a wonderful state to be in.
 |
| Painting detail. |

 |
| Cloud in Bear River East |

After painting exclusively with watercolours for years, I had discovered fluid acrylics and found them to be a logical extension of wet-in-wet watercolours. Fluid acrylics have both the translucency and brilliance of watercolours with the advantage of the flexibility of acrylic. I was so excited about this and I think that energy came through in the painting.


 |
| Into the Light (sold) |
It is interesting to me how much more I get out of the flowers knowing they were lovingly grown by someone I know. If you get a chance to go to the Annapolis Farmer’s Market, stop by Cheryl’s booth and buy some old-fashioned blooms that last forever.


